How to Set Up MFA in Microsoft 365 Using the Microsoft Authenticator Application
How to Set Up MFA in Microsoft 365 Using the Microsoft Authenticator Application
Each year, there are more cybersecurity threats, and one of the most common ways attackers gain access to company systems is through stolen or guessed passwords. Microsoft 365 requires MFA on all employee accounts in order to protect data integrity for employees.
This guide will walk you through what MFA is, why it's important, and how to set it up using the Microsoft Authenticator app on your smartphone.
What is Multi-Factor Authentication?
Multi-Factor Authentication (MFA) is a security feature that adds an extra layer of protection in your login process. Rather than relying only on your password, it also requires you to verify your identity using a separate device, usually your smartphone.
That means that, even if someone manages to steal your password, they still cannot access your account without having your phone for login approval.
Why MFA Was Implemented
MFA protects sensitive data: it prevents unauthorized access to company files, emails, and systems.
Stops password-based attacks: More than 80% of breaches involve stolen or weak passwords. MFA stops these attacks cold.
Meets compliance standards: Several sectors and data protection laws, such as GDPR and ISO 27001, now require the use of MFA for cloud-based accounts.
It's simple, fast, and secure. Just set it up and logging in becomes as easy as tapping "Approve" on your phone.
What You’ll Need
Before you start, ensure that you have:
Your smartphone, either Android or iPhone
The Microsoft Authenticator app installed
To install Authenticator on your iOS device
Scan the QR code

To install Authenticator on your Android device
Scan the QR code

Access to a computer where you can sign in to your Microsoft 365 account
Setup MFA in Microsoft 365 Step by Step
There are two ways you can set up MFA: manually set in on your account as an end user. Or upon sign in being prompted to set up MFA.
Via set up prompt:
Step 1: Log in to Microsoft 365 and
On your computer, go to https://portal.office.com.
Sign in with your work email and password (e.g., yourname@yourcompany.com
If MFA setup is required, you'll see a message asking to set up additional security verification.
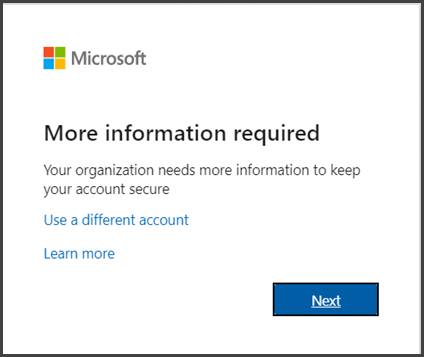
Click Next to start.
Step 2: Choose the Mobile App Option
On the setup screen, in “How should we contact you?”, select Mobile app.
Under “How do you want to use the mobile app?”, select:
Receive notifications for verification.
Click Set up — a QR code will appear on your screen.
Step 3: Set up the Microsoft Authenticator App
Open the Microsoft Authenticator application on your mobile device.
Tap the “+” or Add account button. ( located top right)
Select Work or school account.
Utilize the camera on your phone to scan the QR code shown on your computer screen.
If you can't scan the code, tap "Can't scan image?" and enter the code manually.
Once scanned, your account will appear in the app.
Step 4: Test the Connection
Click Next on your computer.
Microsoft will send a test sign-in request to your phone.
Open the Authenticator app and tap Approve.
Once added, you will see a confirmation message. Click Next again to complete.
Step 5: Add a Backup Method (Recommended)
To avoid being locked out in case you lose or replace your phone:
Add an alternate phone number to include such as work desk or secondary mobile.
In the Authenticator app, select Settings → Backup to enable cloud backup.
Step 6: Complete Setup
Once you have finished all steps:
Click Done to complete MFA setup.
The next time you log in, you’ll:
Enter your Microsoft 365 password.
You will receive a prompt on your phone to approve the sign-in.+
Via Manual set up:
Step 1: Log in to Microsoft 365 and
On your computer, go to https://portal.office.com.
Sign in with your work email and password (e.g., yourname@yourcompany.com
Step 2: click on profile picture on the bottom left of the page
Select view your account
Step 3: open your security settings or password settings
Step 4: Select authenticator app
Click Set up — a QR code will appear on your screen.
Step 5: Set up the Microsoft Authenticator App
Open the Microsoft Authenticator application on your mobile device.
Tap the “+” or Add account button. ( located top right)
Select Work or school account.
Utilize the camera on your phone to scan the QR code shown on your computer screen.
If you can't scan the code, tap "Can't scan image?" and enter the code manually.
Once scanned, your account will appear in the app.
Step 6: Test the Connection
Click Next on your computer.
Microsoft will send a test sign-in request to your phone.
Open the Authenticator app and tap Approve.
Once added, you will see a confirmation message. Click Next again to complete.
Step 7: Add a Backup Method (Recommended)
To avoid being locked out in case you lose or replace your phone:
Add an alternate phone number to include such as work desk or secondary mobile.
In the Authenticator app, select Settings → Backup to enable cloud backup.
Step 8: Complete Setup
Once you have finished all steps:
Click Done to complete MFA setup.
The next time you log in, you’ll:
Enter your Microsoft 365 password.
You will receive a prompt on your phone to approve the sign-in.+
Troubleshooting Tips
Didn't get a notification?
Open the Microsoft Authenticator app. Sometimes it is waiting for your approval.
Changed or lost your phone? You can contact your IT department to reset your MFA setup. No smartphone? Your IT department will be able to facilitate an alternative (e.g., SMS verification). Overview: If you set up MFA, then you are helping keep both your account and the company's data safe. With just one tap on your phone, you add a robust layer of protection from hackers and cyber threats, and that's simple, quick, and secure. ** Remember: Your password protects your account. MFA protects your password.
- Corey Gunter
Related Articles
Remote Work Authenticator Tutorial
Step 1. Log into remote work program. After logging in, you will arrive at the screen shown below. Step 2. Download and install an authenticator app. There are a few options for this, but I recommend using Microsoft's Authenticator app or Google ...Microsoft Windows 11 KB5083769 Remote Desktop changes 04/14/2026
Its a new week and a new Tuesday Microsoft update, this is the breakdown to stay protected after Microsoft's Windows 11 update. Update KB5083769 released the Windows 11 April Patch Tuesday 14th, 2026. The new updates are available under KB5083769 for ...Member servers show invalid time. Would not keep manual set time.
In a domain environment, the FSMO roles holder typically is the authoritative time keeper. net time / set will show you the authoritative time keeper and allow you to sync with that.Quickbooks Online will not Export Data using Windows 10 Edge - SOLVED
Client was having a problem exporting data from her online Quickbooks account. After login in and choosing to export the data from the tools menu, QB will give a pop up error that only Microsoft Windows Explorer can be used. After searching a number ...Remote Desktop Authentication Error has Occurred - Microsoft 866660 Cred SSP
user cannot connect to RDP previously could. An authentication error has occurred. The Fuctioon Requested is not supportd This could be due to CredSSP encryption oracle remediation. If you are unable to connect to your remote server this morning, ...